Day 16 #100DaysOfCode
Hôm này mình đi tìm hiểu thằng Navigation trong React Native. Navigation giúp chúng ta điều hướng qua lại các Component, nó là một bộ định tuyến route cho ta và nó rất cần thiết để chúng ta xem,bởi vì trong ứng dụng thường tích hợp Navigation này.
Bạn có thể tìm hiểu thêm thằng react-native-dom : Nó cũng là một thiết lập định tuyến route , chuyển qua lại component, bạn có thể tùy biến nó một cách dễ dàng URL Router in React
Để biết được React Native một cách nhanh , thì bạn có thể tìm hiểu thằng React trước nhé, bởi vì React và React Native cũng tương tự nhau thôi, chỉ khác đôi chút, bạn có thể xem tất cả bài viết React tại đây:->Xem
# Install Navigation in React Native :
Ok, mở CMD lên và tạo project : npx react-native init RN01
Tiếp theo ta mở CMD lên và chạy các lệnh sau, để cài đặt thự viện Navigation
npm install @react-navigation/native
npm install react-native-reanimated react-native-safe-area-view react-native-gesture-handler react-native-screens react-native-safe-area-context @react-native-community/masked-view
npm install @react-navigation/stack
Sau khi bạn tạo project xong và cài đặt bộ thư viện trên xong. Bạn sẽ được project như hình sau
Trong bài tìm hiểu này mình sẽ tạo các component như: (Home, About,Contact) để chuyển hướng qua lại bằng Navigation.
Okay, bạn tạo component theo đường dẫn sau đây:
+ src/components/Home.js
+ src/components/About.js
+ src/components/Contact.js
Để cấu hình được navigation chuyển qua lại các component ta hãy mở file App.js lên cấu hình như sau:
import React from 'react';
import { View, Text, StyleSheet } from 'react-native';
import { NavigationContainer } from '@react-navigation/native';
import { createStackNavigator } from '@react-navigation/stack';
import Home from './src/components/Home';
import About from './src/components/About';
import Contact from './src/components/Contact';
const App = () => {
  const Stack = createStackNavigator();
  return (
    <>
      <NavigationContainer>
        <Stack.Navigator initialRouteName="Home">
          <Stack.Screen name="Home" component={Home} options={{ title: 'Home Page' }}/>
          <Stack.Screen name="About" component={About} />
          <Stack.Screen name="Contact" component={Contact} />
        </Stack.Navigator>
      </NavigationContainer>
    </>
  )
}
const styles = StyleSheet.create({

})

export default App;
Trong đoạn code trên mình đã thêm vào thư viện dưới đây, dùng để cấu hình Navigation
import { NavigationContainer } from '@react-navigation/native';
import { createStackNavigator } from '@react-navigation/stack';
Trong hàm return() trả về ta cần cấu hình route từng con component trỏ tới, bạn có thể thấy nó như dưới đây:
<NavigationContainer>
        <Stack.Navigator initialRouteName="Home">
          <Stack.Screen name="Home" component={Home} options={{ title: 'Home Page' }}/>
          <Stack.Screen name="About" component={About}  options={({ route }) => ({ title: route.params.name })}/>
          <Stack.Screen name="Contact" component={Contact} />
        </Stack.Navigator>
      </NavigationContainer>
Chú ý các thuộc tính sau đây:
+ initialRouteName : dùng để chỉ định component đầu tiên được hiện trong project của bạn
+ name: tên bạn muốn gọi tới component , để sao này bạn có thể dùng navigation.push("Home") hoặc navigation.navigate("Home"), để chuyển tởi component, hoặc chèn gửi tham số qua component khác
navigation.navigate("Detail",
{
  idDetail:123,
  otherParam:{
     name:"Title Detail"
     image:"image_1234.jpg"
}})
+ component: ta cần khai báo con component nào tại đây
+ option : là thuộc tính rất đặt biệt, bạn có thể update title của site bar hoặc chèn tham số qua component. VD: option={{title:"Home Page"}} or options={({ route }) => ({ title: route.params.name })}
Bên cạnh đó mình cũng có thể cài đặt nút back quay trở lại một cách tùy ý, ví như như: icon của cái nút đó, có thể tùy chỉnh, các bạn có thể tìm hiểu thêm thông tin dưới đây, hoặc xem thêm tại đây: Xem
<Stack.Screen
  name="Home"
  component={HomeScreen}
  options={({ navigation }) => ({
    title: 'Awesome app',
    headerLeft: () => (
      <DrawerButton onPress={() => navigation.toggleDrawer()} />
    ),
  })}
/>
Okay mình đã cấu hình xong phần Navigation trong file App.js rồi, giờ ta hãy mở từng Component lên và chỉnh sửa lại giao diện như sau:
+ src/components/Home.js
import React from 'react'
import {View,Text,Button,StyleSheet} from 'react-native'
const Home=({navigation,route})=>{

    return (
        <>
            <View style={styles.container}>
                <Text>Title </Text>
                <Button onPress={()=>navigation.navigate("About",{ name: 'Tile About' })} title="Go to About" />
                <Button onPress={()=>navigation.navigate("Contact")} title="Go to Contact" />
            </View>
        </>
    )
}
const styles = StyleSheet.create({
    container:{
        flex:1
    }
})
export default Home
+ src/components/About.js
import React from 'react'
import {View,Text,Button,StyleSheet} from 'react-native'
const About=({navigation,route})=>{
    return (
        <>
            <View>
                <Text>About</Text>
                <Button title="Go to Contact"  onPress={()=>navigation.navigate("Contact",
                {
                    idContact:123,
                    otherParam:{
                        name:"Title Contact",
                        image:"hinh.jpg"
                    }
                }

                )}/>
            </View>
        </>
    )
}

export default About
+ src/components/Contact.js
import React from 'react'
import {View,Text,Button,StyleSheet} from 'react-native'
const Contact=({navigation,route})=>{
    return (
        <>
            <View>
                <View>
                    <Text>id: {route.params.idContact}</Text>
                    <Text>Name:{route.params.otherParam.name}</Text>
                    <Text>Image:{route.params.otherParam.image}</Text>
                </View>
                <Button title="Go back" onPress={() => navigation.goBack()} />
                <Button
                    title="Go back to first screen in stack"
                    onPress={() => navigation.popToTop()}
                />
            </View>
        </>
    )
}

export default Contact
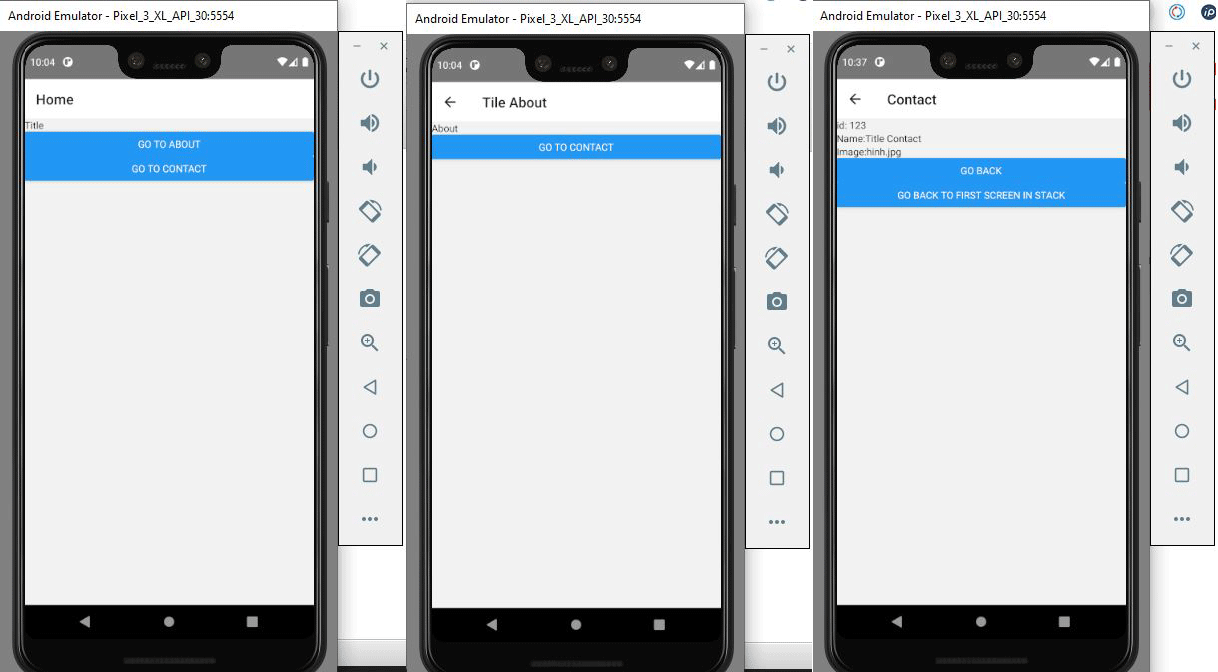
Demo:

Bạn có thể xem thêm về Navigation tại đây: https://reactnavigation.org/docs/getting-started
Tìm hiểu từng bước cài đặt React.js : https://hoanguyenit.com/react

